Thursday, January 19, 2012

How to take photos in the snow - Q&A with a student

One of my photography students wanted to know more about taking photos in the snow, so here is a Q&A with Hannah about photography in the snow.

Q: Do I use flash when I take snow photos?
A: Try not to, especially when the snow is still falling.  The flash will typically make your camera and flash focus on the snowflakes, not the background.  Here’s an example of why this doesn’t work:

100_0314

Q: How do you keep your camera dry?
A: Take pictures from under an umbrella or out of your car window or under the eaves of your house.

IMG_4731IMG_4750

Q: What are good things to take pictures of?
A: Portraits are perfect for snow.  Snow reflects light and creates a great lighting situation for taking pictures of people.  They're faces are well lit from above, below and all around.  Landscapes are always good, but remember, the heavier it is snowing, the more that snow will obscure your photo - making it a little blurry (even without flash).

IMG_4806

Good Luck!

Kelly

Tuesday, January 17, 2012

Teaching Photography

Today I started my photography and digital imaging class at the school where I work.  I found this today on Facebook as well.  It seems fitting.  Enjoy.

Ten lessons the arts teach

January 12th, 2012 by Kim Hermanson, Ph.D.

  1. The arts teach children to make good judgments about qualitative relationships. Unlike much of the curriculum in which correct answers and rules prevail, in the arts, it is judgment rather than rules that prevail.
  2. The arts teach children that problems can have more than one solution and that questions can have more than one answer.
  3. The arts celebrate multiple perspectives. One of their large lessons is that there are many ways to see and interpret the world.
  4. The arts teach children that in complex forms of problem solving, purposes are seldom fixed, but change with circumstance and opportunity. Learning in the arts requires the ability and a willingness to surrender to the unanticipated possibilities of the work as it unfolds.
  5. The arts make vivid the fact that neither words in their literal form nor numbers exhaust what we can know. The limits of our language do not define the limits of our cognition.
  6. The arts teach students that small differences can have large effects. The arts traffic in subtleties.
  7. The arts teach students to think through and within a material. All art forms employ some means through which images become real.
  8. The arts help children learn to say what cannot be said. When children are invited to disclose what a work of art helps them feel, they must reach into their poetic capacities to find the words that will do the job. 
  9. The arts enable us to have experience we can have from no other source and through such experience to discover the range and variety of what we are capable of feeling.
  10. The arts' position in the school curriculum symbolizes to the young what adults believe is important.

* Excerpted from Elliot Eisner, The Arts and the Creation of Mind, 2002, published by NAEA Publications.  

-Kelly

Monday, January 16, 2012

Rollei Redbird

I stumbled upon this film at Freestyle.  It’s wound into the film canister backwards, so you shoot photos through the anti-halogen coating layer.  Results: Even the bluest of skies turns red.  Great silhouettes too.
IMG_9445
Get some!
Kelly

Monday, October 17, 2011

Edit Out Breast Cancer

Welcome to the first installment of Edit out Breast Cancer.  This week’s photo was submitted by Heidi.  She can view, download and use the web sized photo free, or contribute $25 to Passionately Pink for the Cure to get the full resolution file.

Original Photo:

2011-07-27_09-04-18_211

Boosted colors, sharpness:

2011-07-27_09-04-18_211 edit 1

A moody black and white.  Burned down the right side and lightened up the left side to provide even tones.

2011-07-27_09-04-18_211 edit 2

So, there you have it.  Please email your sharp, well exposed photos to authenticallybeautifulphotography@hotmail.com

Kelly

Monday, September 19, 2011

Edit Out Breast Cancer

If you follow my work, you may have noticed that breast cancer is my cause of choice.  I have a sister, mother, and a large group of close girl friends I love so much.  I want to find a cure before breast cancer effects any more of the women in my life or the lives of others.

I’ve been donating 5% of proceeds from photo shoots to breast cancer through Passionately Pink for the Cure.  I also have organized a number of fundraisers.  In addition to running another event this upcoming October and a special photo fundraiser for Passionately Pink (more on that soon!), I’m going to start a regular feature here and on my photography business's blog where I will edit viewer photos to raise awareness and funds for Passionately Pink for the Cure.

Here’s how it works - send your sharp, high resolution photos to authenticallybeautifulphotography@hotmail.com.  I will edit them (for FREE), then post a 500px wide copy on this blog. 

I will retouch the photo using all the fun tools and actions available to me in Photoshop and post the before and after shots.

If you sent the photo in, you will be free to download the blog sized file and use it online to your content.  If you love the photo, I will sell the high-resolution version of the file for $25, all of which I will donate to Passionately Pink for the Cure.  The high res file is great for websites and printing spectacular photos to display in your home.

Here’s an example of a fan photo sent in by Melanie that I retouched recently.

231 composite

Now she has an amazing photo of her and her daughter to print and display in her home.

To participate, send your photos to authenticallybeautifulphotography@hotmail.com.  I’ll be posting a new edit every Monday for your viewing and fundraising pleasure.

Thanks,

Kelly

Friday, September 9, 2011

Backlighting - Photo Challenge and a Peek at Post-Processing

Over at Rock the Shot (www.rocktheshotforum.com), they’re having their September Photo Challenge - Backlighting.  One of the sponsors is also Oh So Posh Photography who makes amazing actions.  So, I thought I’d share a photo I processed using Moonlight from the Bohemian Symphony Collection by Oh So Posh.
IMG_0187

This was from a maternity shoot I shot a long time ago.  The light coming into this covered bridge was so pretty and the way it backlit her hair looked so angelic.
I didn’t do a whole lot to this in Photoshop.  As always, I do some clone stamping to smooth skin imperfections and sharpened the eyes just slightly so they would pop against the haziness of the photo.  I used a little dodging on this one to lighten her face.  Finally, I ran moonlight from the Bohemian Symphony collection to warm up the photo a little.
I love how hazy, glowy and warm she looks in the final photo.  What do you think?
Kelly
Rock the Shot

Tuesday, September 6, 2011

More Night Photography

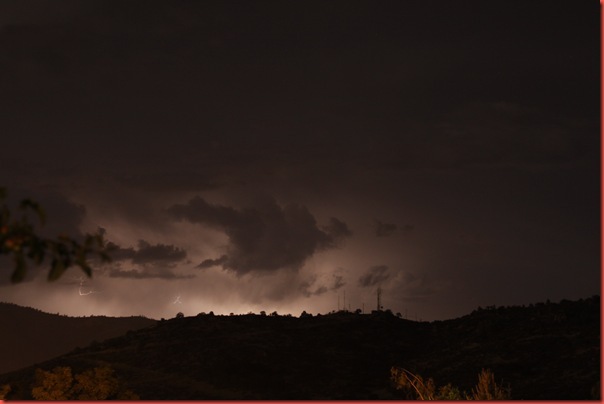
There are so many interesting things to photograph at night.  Stars, lightening, and a multitude of interesting things that can be seen during the day, but have an entirely different look at night.  Here are a series of shots I took in the backyard the other night during a lightening storm, along with the how to and some exposure guides.
_MG_2295
First things first, I took nearly all the landscape shots at ISO 400, F4.5 for 30 seconds.  The timing worked well with both the city lights and the lightening strikes (which were far away).  Some shots are brighter than others because there were more strikes, some are darker.  Lightening has changing lighting conditions, so it’s hit or miss.
You can take 2 approaches to this.  Shoot on bulb and leave the shutter open until the lightening strikes, then close it again - OR - expose for the ambient light and take enough shots to get a few well lit stormy scenes.  I used the second technique.  If your sky-scape will be entirely filled with lightening (example, you’re closer to the storm or have a really cool telephoto lens), I suggest the first technique.
_MG_2304
The moon was a different story.  Still at ISO 400, but at f36 for 1/2 second.  The moon is very bright, so to catch details and not a large starburst-flare-light blur, use a small aperture and shorter exposure.
_MG_2315
However, if you want to blur out the moon and take night shots that simulate daylight, open the aperture back up and go back to a longer exposure.  ISO 400, f3.5 for 30 seconds.  The shadows and window light have an interesting almost creepy effect.  You could take this shot in the day, but it wouldn’t be half as fun.
_MG_2325
This last strange shot is of me walking around with my cell phone using a flashing lights app on my droid.  Walk around for 30 seconds with any light to get this cool trail effect in long exposures.
_MG_2326
So, that’s about it.  Grab a tripod and a cable release for your DSLR and experiment.  There are so many neat things lurking in the dark for you.
Kelly